With the 25th anniversary of the first Macintosh computer coming up on January 24th, 2009, we’re taking a look back in time at the evolution of Apple products.
Most have been notable leaps forward, while some were famous flops. Whether or not their inventions were accepted by the marketplace, Apple has consistently put out products that raise the bar for the computer and telecommunications industry.
The list compiled for this article is by no means a complete compilation of all Apple products. We chose to highlight those products where the design changes are best appreciated.
All-In-One Computers
Apple has sold “all-in-one” computers that have built-in monitors from its very early days. Although some models were classified as All-In-One, they had separate monitors packaged in the same box.
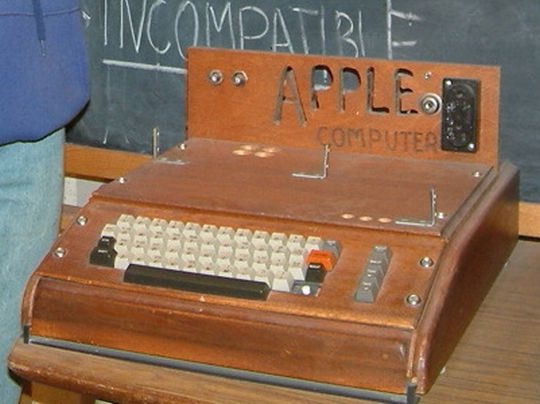
Apple I - 1976

![]()
![]()
Apple II – 1977
1977 saw the invention of both the Apple II and the famous rainbow Apple logo. Steve Jobs added the colours to the logo to reflect the Apple II’s superior colour output. Colour graphics set the Apple II apart from its rivals on the market. Image: Wikipedia

Apple III – 1980
This next iteration of the Apple computer for business was created primarily to compete with business computing companies like IBM. Image: Wikipedia

Apple IIe – 1983
The Apple IIe keyboard was built in to the computer and did away with the numeric keypad. Image: Wikipedia

Lisa/Macintosh XL – 1983
While Lisa won the legendary race between itself and the Macintosh by being the first desktop computer to market with an intuitive GUI, it flopped with the public due to sticker shock at its $10,000 price tag and a lack of software titles. Image: Wikipedia
Apple IIc – 1984
The Apple IIc represented Apple’s first attempt at both a portable computer and “out-of-the-box” functionality. The only problem with classifying the IIc as a “portable” computer is the fact that it lacked a portable power supply. Image: Wikipedia

Macintosh – 1984
The Macintosh, for most of us, was the computer that started it all. In the first demonstration of the product at MacWorld, Steve Jobs pulled the very first Macintosh out of the bag and demonstrated product features that most of us take for granted now. Image: Wikipedia

Apple IIGS – 1986
The first 50,000 of these came with Steve Wozniak’s signature silkscreened on the front. Image: Wikipedia

Macintosh Plus – 1986
The Plus version of the Macintosh originally featured the same beige colour as the original Macintosh, but in 1987 was changed to the warm gray Platinum colour that would characterize Apple computers for years to come. Image: Wikipedia

Macintosh SE – 1987
Space for an internal hard disk and advanced SCSI support were some of the selling features of the SE. Image: Wikipedia

Apple IIc Plus – 1988
With this model, Apple did away with the 5.25″ floppy in the Apple II line and switched over completely to the 3.5″ floppy. Image: Wikipedia
 Macintosh SE/30 – 1989
The SE/30 sported the capacity for expandable RAM and a 1.44mb floppy disk drive as standard. Image: Wikipedia

Macintosh Classic – 1990
The Classic was an adaptation of Terry Oyama’s and Jerry Oyama’s Macintosh 128K industrial design. Image: Wikipedia

Macintosh Classic II – 1991
Two cases actually came out for the Classic II. The pictured one has a speaker cutout on the left side for better sound. Image: Wikipedia

Macintosh Color Classic – 1993
This was the first colour compact Macintosh computer. Image: Wikipedia

Apple Macintosh LC 500 – 1993
The Apple MacIntosh LC series were sold as Apple’s upper low end computers for the mid 1990’s. Image: Wikipedia.

Macintosh Performa 5200 – 1995
This was one of Apple’s lower moments, featuring severely compromised hardware design. Image: Wikipedia

Twentieth Anniversary Macintosh (TAM) – 1997
12,000 of these were produced. Apple broke the moulds and didn’t make any more in order to make the product seem more “exclusive”, a strategy that did not help the TAM’s sales numbers. Image: Wikipedia

PowerMac G3 All-In-One – 1998
These were sold to the educational market only. Image: Wikipedia

iMac G3 Tray-Loading, Bondi Blue – 1998
In doing away with the tower and keeping the computing power, Apple completely revolutionized the desktop computer industry. The iMac G3′s were available in a bouquet of various colours. Johnathan Ive, the designer who was later the mastermind of the Cube, designed the iMac G3. Image: Wikipedia

iMac G3 Slot-Loading Indigo – 1999
The above model set the standard for the rest of the iMac G3′s with a slot-loading CD ROM rather than a tray-loading model. Image: Wikipedia

iMac “Flavours” – 1998-2003
Different colours were eventually added to the original Bondi Blue. Image: Wikipedia

eMac – 2002
The eMac was made available as a cheaper option to the educational market than the iMac. Image: Trimir

iMac G4 – 2002
The iMac G4 was produced from 2000-2004 and represents the first iteration of Apple’s desire to “slim down” the components necessary for an out of the box personal computer experience. It was nicknamed the iLamp because of its swiveling monitor. Image: Marc Burr

iMac G5 – 2005
The G5 lacked the swivel functionality of the G4 but introduced the “behind-the-screen” component design principle which characterized future iMac designs. Image: Wikipedia

iMac (Intel Based) – Aluminum – 2007
The current iMac models pack all of the components necessary to the operation of a computer behind the monitor in a perfect realization of “slim design”. Image: Wikipedia

Desktop Computers
Macintosh II – 1987
This was the first “modular” design computer that Apple put out. All of the rest preceding it had been “all-in-one” models. Image: Wikipedia

Macintosh IIx – 1988
This was simply an update to the Macintosh II. One of its code names was “Spock”. Image: Wikipedia

Macintosh IIfx – 1990
This computer was introduced as the “fastest Mac” and was dubbed “Wicked Fast” by the then Product Manager, Frank Casanova. Image: Wikipedia

Quadra 700 – 1991
Introduced with the Quadra 900 as the first Apple systems to feature Ethernet networking. Image: Wikipedia

Quadra 800 – 1993
The case on this was smaller and not as accessible as others, earning it the “worst case of all time” title at Low End Mac. Image: Wikipedia

Quadra 630 – 1994
This last entry in the Quadra line featured an IDE drive, a slower yet cheaper replacement for the standard SCSI drives that earlier Quadras contained. This was the last in the Quadra line. Image: Wikipedia

Power Macintosh G3 – 1997
The PowerMac G3 was tested and proven to be the fastest desktop computer of its time by Byte Magazine. Image: Wikipedia

PowerMac G3 Blue and White – 1999
This shared the hardware with its predecessor but little else. The case was redesigned to bring it in line with the new iMac. Image: Apple.com

Power Mac G4 – 1999
This line was sold by Apple between 1994 and 2006. While the hardware varied between models, they all adhered to the same basic design principles. Image: Wikipedia

Power Mac G5 – 2003
At the time of its launch the Power Mac G5 was touted as the fastest computer ever built. Image: Wikipedia

Mac Pro – 2006
This machine integrated Intel’s 5400 chipset with Xeon microprocessors for a lightning fast processing speed. Image: Apple.com

Mini Desktops
PowerMac G4 Cube – 2000
This 8″ cube garnered a lot of kudos in the short time that it was in production. The designer of the Cube, Jonathan Ive, won several international awards for its design. Image by Apple.com

Mac Mini – 2005
This diminutive computer only measured 6.5″ by 2″. It weighed in at 2.5 pounds. Image: Apple.com

Notebooks
Macintosh Portable – 1989
The Macintosh Portable represented Apple’s first computer with a portable power supply and an active matrix LCD screen which sported a clearer picture than many desktop monitors of the time. Image: Wikipedia

PowerBook 100 – 1991
The PowerBook 100 was a result of a collaboration between Sony and Apple – Sony miniaturized the parts for Apple for the 100. The 140 and the 170 are the first PowerBooks completely designed by Apple. Mobile PC magazine named the PowerBook 100 as its “#1 gadget of all time” in a 2005 article. Image: Wikipedia
 PowerBook Duo – 1992
This precursor to the MacBook Air was a subnotebook that interfaced with larger storage media either through a docking port or through cables. Image: Wikipedia

PowerBook 180c – 1993
First PowerBook to display 640×480 resolution and 256 colours. Image: Wikipedia

PowerBook 540c – 1994
The trackpad replaced the trackball with this model. Image: Wikipedia

PowerBook 1400 – 1996
This entry-level notebook came in a number of different configurations. Image: Wikipedia

eMate 300 – 1997
Personal digital assistant designed for classroom use and based on the Newton engine. Image: Wikipedia

PowerBook G3 – 1997
The Wallstreet model, pictured above, marked the last use of the rainbow-coloured Apple logo. The PowerBook G3 was a built-to-order laptop which allowed users to customize what they wanted on the machine. Image: Wikipedia

iBook – 1999
The first generation of the iBook featured a clamshell design and wireless networking. Image: eLanso

iBook G3 Dual USB – 2001
Many design advances were incorporated into this complete redesign, including the L-Shaped hinge for the screen and a slim-line design. Image: Wikipedia

PowerBook G4 – 2001
The titanium-skinned PowerBook G4 was the precursor to the MacBook Pro. Image: Wikipedia
 iBook G4 – 2004
A slot loading drive and a lack of translucent design characterized this release of the iBook. Image: Apple.com

PowerBook G4 – Aluminum – 2003
Aluminum was used for the first time in this incarnation of the PowerBook. Johnathan Ive, the same award-winning product designer responsible for the Cube, designed this PowerBook. Image: Wikipedia

MacBook – 2006
2006 saw the introduction of the MacBook with now-standard features like the magnetic latch, the glossy display and the sunken keyboard. Image: Wikipedia

MacBook Pro – 2006
The aluminum standard by which all others are measured. In the case of the current MacBrook Pro, each case is constructed out of a single block of aluminum. Image: Wikipedia

MacBook Air – 2008
The MacBook Air was launched with a famous commercial that involved it being packaged up and shipped in an envelope. Image: Apple.com

MacBook – 2008
The latest version of the MacBook brings the aluminum case previously reserved for the Pro line into the regular MacBook. Image: Wikipedia

MacBook Pro – 2008
The most recent Pro design is available in a 15″ or 17″ model. Images via Apple.com

Keyboards
Macintosh Keyboard – 1984
This keyboard was standard issue with the Macintosh Plus and was the first keyboard to see the “Command” key. Image: Wikipedia

Apple Extended Keyboard – 1990
This keyboard represents the golden age of Apple keyboards for many fans. The large spaces between keys and the general feel of the board made it very popular. Image: Wikipedia

USB Keyboard – 1998
This board was packaged with iMacs beginning in 1998 and lasting until 2000. Image: Wikipedia

Apple Pro Keyboard/Apple Keyboard – 2000
This keyboard had the “Command” letters removed from the command key entirely. When it was originally introduced it was available in a clear case with black keys. After its name was officially changed to the “Apple Keyboard”, it was released only in white. Image by 2aday.com

Current Apple Keyboard – 2007
The current Apple keyboard features an aluminum enclosure and is the first since the Apple IIe keyboard to remove the Apple logo from the Command key. Image: Apple.com

Mice
Macintosh Mouse – 1984
While the Macintosh is responsible for making the computer mouse part of our everyday reality, it was actually an adaptation of the mouse designed for the Lisa and was not the first mouse used by Apple. Image: Wikipedia

Apple IIc Mouse – 1984
This mouse removed the contrasting colours featured on the Macintosh mouse and also offered support for gaming devices such as joysticks. Image: Wikipedia

Apple Desktop Mouse – 1986
Image: Wikipedia

ADB Mouse II – 1993
This update was included with all Macs between 1993 and 1998. Image: Wikipedia

iMac USB Mouse – 1998
This mouse was shipped with all iMacs for two years after its introduction. Image: Russell Heimlich.

Mighty Mouse Wireless – 2005
It was announced and sold for the first time on August 2, 2005. Before the Mighty Mouse, Apple had sold only one-button mice with its computers, beginning with the Apple Lisa 22 years earlier. Image: Apple.com

Displays
Apple IIc Flat Panel Display – 1984
Only 10,000 of these were ever produced, owing to the fact that you needed a strong light source to even see what was on the screen. Image: Wikipedia

AppleColor RGB – 1986
The first 640×480 stand-alone monitor made by Apple. Image: Wikipedia

Apple AudioVision 14 – 1993
This monitor featured a 14″ Triniton display. Image: Wikipedia

Apple Studio Display – 1998
This was released to be paired with the Power Macintoshes of the time and featured an active matrix LCD screen. Image by everymac.com

Apple Studio Display – Blueberry – 1999
This was released to complement the PowerMac G3 which was released in “Blueberry” at the time. Image by everymac.com

Apple Studio Display CRT Blueberry – 1999
This monitor kept the “Blue” theme going with an attractive design. Image by everymac.com

Apple Studio Display CRT – 2000
This monitor was the last CRT monitor that Apple shipped. Image by everymac.com

Apple Cinema Display 22″ – 2000
The 22″ active matrix LCD display on this model was tailored to work with the newly released PowerMac G4′s. Image: Wikipedia

Apple Cinema Display 20″ – 2003
Featured a 20″ active matrix LCD display. Image by Amazon.com

Apple Cinema Displays – 2004- Current
Current Apple Cinema Displays come in three different sizes; 20″, 23″ and 30″. Image by Apple.com

LED Cinema Display, 24″ – 2008
This display is touted as Mac’s “greenest” ever. Image by Apple.com

iPod
While other MP3 players were on the market before 2001, none could match the ease of use of the iPod. The iPod line consists of four different products; the iPod Shuffle, the iPod Nano, the Ipod Classic, and the iPod Touch.
The Newton – 1993
While the Newton was a massive flop at the time of its release, it laid the groundwork for Apple’s massively popular iPhone and iPod. Two ex-Apple Newton developers founded the company that developed the iPod’s OS, Pixo.

Ipod/Ipod Classic
Generation One – 2001
The first generation of the iPod was debuted in 2001 to rave reviews and a very eager market. Image: Wikipedia

Generation Two – 2002
The second generation of the iPod featured a touch-sensitive wheel rather than a mechanical wheel. Image: Wikipedia

Generation Three – 2003
The third generation saw the introduction of a thinner iPod. Instead of being simply touch-sensitive as the second generation was, the wheel on this iPod was completely governed by touch. Image: Wikipedia

Generation 4 – 2004
The fourth generation saw the Touch Wheel replaced with the Click Wheel from the iPod Mini. A special Harry Potter edition and U2 edition were released in this generation. Image: BatteriesForIpod

Fifth Generation – 2005
2005 brought this iteration of the iPod, unofficially dubbed iPod Video. Image: Les Numeriques

Sixth Generation – 2007
The sixth generation brought an official rename to “iPod Classic” in order to distinguish the iPod from the others in the line. Image: Wikipedia

iPod Shuffle – 2005
This first generation was introduced at MacWorld with the tag line “Life is Random”. Image: Apple.com

iPod Shuffle – 2006
The smaller iPod Shuffle is the smallest device made by Apple. It relies on flash memory rather than a hard disk like the other iPods. Image: Apple.com

iPod Shuffle in Colour – 2008
The Ipod Shuffle was updated in 2008 with four new colours. Image by apple.com

iPod Nano
First Generation – 2005
Image: eShop Macsales

Second Generation – 2006
Image: Les Numeriques

Third Generation – 2007
Image: Apple.com

Fourth Generation – 2008
Image: Apple.com

iPod Touch – 2007
The iPod Touch was launched to great media and consumer acclaim in March of 2007. The touch screen allows the user interaction with various games and applications. Steve Jobs has referred to the iPod Touch as the “training wheels” for the iPhone. Image: Apple.com

iPhone – 2007
The iPhone is the cellular phone of choice of nearly every tech aficionado, even winning over BlackBerry fanboys with its touch screen and wide range of cheap and free applications available from the iTunes AppStore. Image: Apple.com

Over the course of its lifetime as a company, Apple has been responsible for most of the groundbreaking design features that we have come to appreciate on any laptop, computer, or cellphone. Their consistent record as groundbreakers in the design field alone is enough to garner them a cult following; their technological advances simply cement their followers to whatever amazing product they will release next.
Source


